Настройка телефонного аппарата Cisco-6921
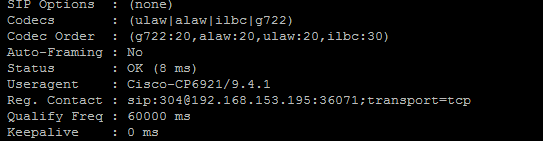
В данной статье рассмотрим подключение аппарата Cisco 6921 к серверу телефонии Asterisk.
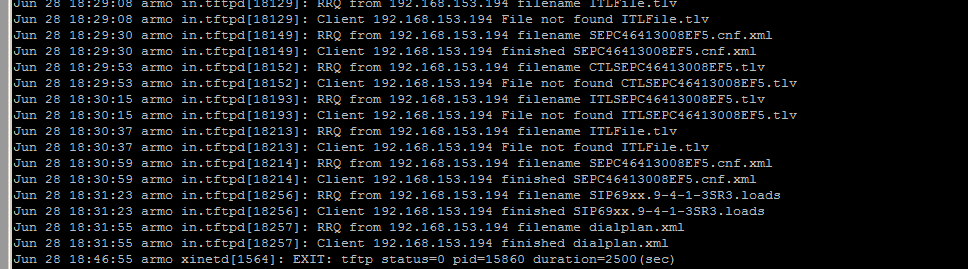
Для начала — аппарат настраивается не через web-интерфейс, а через tftp. Соответственно на сетевом оборудовании должна быть настроена опция 66 и открыт порт 69 на сервере tftp.
Подключаем аппарат в сеть и дожидаемся получения им ip-адреса. После того как аппарат запустится он начнет слать запросы на сервер за файлом конфигураций, соответственно он там должен быть в виде SEP*MAC*.cnf.xml (без **).
В файле конфигураций меняем значения:
<callManager>
<processNodeName>ip Asterisk</processNodeName>
<ports>
<sipPort>5060</sipPort>
<securedSipPort>5061</securedSipPort>
<ethernetPhonePort>2000</ethernetPhonePort>
</ports>
</callManager>
В блоке Line:
<featureLabel>phone_number</featureLabel>
<proxy>ip Asterisk</proxy>
<name>phone_number</name>
<displayName>phone_number</displayName>
<authName>phone_number</authName>
<authPassword>1234567890</authPassword>
<contact>phone_number</contact>
В блоке локализации:
<networkLocaleInfo>
<name>Russian_Federation</name>
<uid></uid>
<version></version>
</networkLocaleInfo>
<loadInformation>SIP69xx.9-4-1-3SR3</loadInformation> — прошивка
Так же возможно использовать на аппарате телефонную книгу, для этого необходимо указать в параметре <directoryURL> полный путь к файлу, соответственно файл по этому пути должен быть доступен и иметь формат вида:
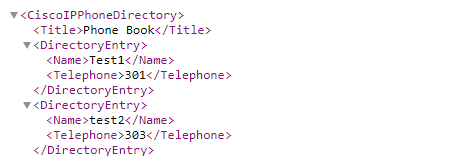
<?xml version=»1.0″ encoding=»UTF-8″?>
<CiscoIPPhoneDirectory>
<Title>Phone Book</Title>
<DirectoryEntry>
<Name>Test1</Name>
<Telephone>301</Telephone>
</DirectoryEntry>
<SoftKeyItem>
<Name>next</Name>
<URL>PATH-to-next</URL>
</SoftKeyItem>
</CiscoIPPhoneDirectory>
Пример конфигурации:
<?xml version=»1.0″ encoding=»UTF-8″?>
<device>
<deviceProtocol>SIP</deviceProtocol>
<sshUserId>cisco</sshUserId>
<sshPassword>Y3b6IFQzjctb</sshPassword>
<devicePool>
<dateTimeSetting>
<dateTemplate>D/M/Y</dateTemplate>
<timeZone>Saudi Arabia Standard Time</timeZone>
<ntp>
<name>192.168.153.10</name>
<ntpMode>Unicast</ntpMode>
</ntp>
</dateTimeSetting>
<callManagerGroup>
<members>
<member priority=»0″>
<callManager>
<processNodeName>192.168.153.10</processNodeName>
<ports>
<sipPort>5060</sipPort>
<securedSipPort>5061</securedSipPort>
<ethernetPhonePort>2000</ethernetPhonePort>
</ports>
</callManager>
</member>
</members>
</callManagerGroup>
</devicePool>
<sipProfile>
<natEnabled>false</natEnabled>
<natAddress></natAddress>
<sipProxies>
<registerWithProxy>true</registerWithProxy>
<outboundProxy></outboundProxy>
<outboundProxyPort></outboundProxyPort>
<backupProxy></backupProxy>
<backupProxyPort></backupProxyPort>
</sipProxies>
<sipCallFeatures>
<cnfJoinEnabled>true</cnfJoinEnabled>
<callForwardURI>x—serviceuri-cfwdall</callForwardURI>
<callPickupURI>x-cisco-serviceuri-pickup</callPickupURI>
<callPickupListURI>x-cisco-serviceuri-opickup</callPickupListURI>
<callPickupGroupURI>x-cisco-serviceuri-gpickup</callPickupGroupURI>
<meetMeServiceURI>x-cisco-serviceuri-meetme</meetMeServiceURI>
<abbreviatedDialURI>x-cisco-serviceuri-abbrdial</abbreviatedDialURI>
<rfc2543Hold>false</rfc2543Hold>
<callHoldRingback>2</callHoldRingback>
<localCfwdEnable>true</localCfwdEnable>
<semiAttendedTransfer>true</semiAttendedTransfer>
<anonymousCallBlock>2</anonymousCallBlock>
<callerIdBlocking>2</callerIdBlocking>
<dndControl>1</dndControl>
<remoteCcEnable>true</remoteCcEnable>
</sipCallFeatures>
<sipStack>
<sipInviteRetx>6</sipInviteRetx>
<sipRetx>10</sipRetx>
<timerInviteExpires>180</timerInviteExpires>
<timerRegisterExpires>3600</timerRegisterExpires>
<timerRegisterDelta>5</timerRegisterDelta>
<timerKeepAliveExpires>120</timerKeepAliveExpires>
<timerSubscribeExpires>120</timerSubscribeExpires>
<timerSubscribeDelta>5</timerSubscribeDelta>
<timerT1>500</timerT1>
<timerT2>4000</timerT2>
<maxRedirects>70</maxRedirects>
<remotePartyID>true</remotePartyID>
<userInfo>None</userInfo>
</sipStack>
<autoAnswerOverride>true</autoAnswerOverride>
<transferOnhookEnabled>false</transferOnhookEnabled>
<enableVad>false</enableVad>
<dtmfAvtPayload>101</dtmfAvtPayload>
<dtmfDbLevel>3</dtmfDbLevel>
<dtmfOutofBand>avt</dtmfOutofBand>
<alwaysUsePrimeLine>false</alwaysUsePrimeLine>
<alwaysUsePrimeLineVoiceMail>false</alwaysUsePrimeLineVoiceMail>
<kpml>3</kpml>
<stutterMsgWaiting>1</stutterMsgWaiting>
<callStats>false</callStats>
<silentPeriodBetweenCallWaitingBursts>10</silentPeriodBetweenCallWaitingBursts>
<disableLocalSpeedDialConfig>false</disableLocalSpeedDialConfig>
<startMediaPort>16384</startMediaPort>
<stopMediaPort>32766</stopMediaPort>
<preferredCodec>none</preferredCodec>
<phoneLabel>303</phoneLabel>
<sipLines>
<line button=»1″>
<featureID>9</featureID>
<featureLabel>303</featureLabel>
<proxy>USECALLMANAGER</proxy>
<port>5060</port>
<name>303</name>
<displayName>303</displayName>
<autoAnswer>
<autoAnswerEnabled>2</autoAnswerEnabled>
</autoAnswer>
<authName>303</authName>
<authPassword>KoJ5Dt-_w1qSBQ</authPassword>
<messageWaitingLampPolicy>1</messageWaitingLampPolicy>
<messagesNumber></messagesNumber>
<sharedLine>false</sharedLine>
<ringSettingIdle>4</ringSettingIdle>
<ringSettingActive>5</ringSettingActive>
<contact>303</contact>
<forwardCallInfoDisplay>
<callerName>true</callerName>
<callerNumber>true</callerNumber>
<redirectedNumber>false</redirectedNumber>
<dialedNumber>true</dialedNumber>
</forwardCallInfoDisplay>
</line>
</sipLines>
<voipControlPort>5060</voipControlPort>
<dscpForAudio>184</dscpForAudio>
<ringSettingBusyStationPolicy>0</ringSettingBusyStationPolicy>
<dialTemplate>dialplan.xml</dialTemplate>
</sipProfile>
<commonProfile>
<phonePassword>1</phonePassword>
<backgroundImageAccess>true</backgroundImageAccess>
<callLogBlfEnabled>2</callLogBlfEnabled>
</commonProfile>
<loadInformation>SIP69xx.9-4-1-3SR3</loadInformation>
<vendorConfig>
<disableSpeaker>false</disableSpeaker>
<disableSpeakerAndHeadset>false</disableSpeakerAndHeadset>
<pcPort>0</pcPort>
<settingsAccess>1</settingsAccess>
<garp>0</garp>
<voiceVlanAccess>0</voiceVlanAccess>
<videoCapability>0</videoCapability>
<autoSelectLineEnable>0</autoSelectLineEnable>
<webAccess>0</webAccess>
<sshAccess>0</sshAccess>
<daysDisplayNotActive>1,2,3,4,5,6,7</daysDisplayNotActive>
<displayOnTime>00:00</displayOnTime>
<displayOnDuration>00:00</displayOnDuration>
<displayIdleTimeout>00:00</displayIdleTimeout>
<spanToPCPort>1</spanToPCPort>
<loggingDisplay>1</loggingDisplay>
<loadServer></loadServer>
</vendorConfig>
<versionStamp>1143565489-a3cbf294-7526-4c29-8791-c4fce4ce4c37</versionStamp>
<userLocale>
<name>Russian_Russian_Federation</name>
<uid></uid>
<langCode>ru_RU</langCode>
<version>11.5.1.3000-1</version>
<winCharSet>UTF-8</winCharSet>
</userLocale>
<networkLocale>Russian_Federation</networkLocale>
<networkLocaleInfo>
<name>Russian_Federation</name>
<uid></uid>
<version>11.5.1.3000-1</version>
</networkLocaleInfo>
<deviceSecurityMode>1</deviceSecurityMode>
<authenticationURL></authenticationURL>
<directoryURL>PATH-to-xml</directoryURL>
<idleURL></idleURL>
<informationURL></informationURL>
<messagesURL></messagesURL>
<proxyServerURL></proxyServerURL>
<servicesURL></servicesURL>
<dscpForSCCPPhoneConfig>96</dscpForSCCPPhoneConfig>
<dscpForSCCPPhoneServices>0</dscpForSCCPPhoneServices>
<dscpForCm2Dvce>96</dscpForCm2Dvce>
<transportLayerProtocol>1</transportLayerProtocol>
<capfAuthMode>0</capfAuthMode>
<capfList>
<capf>
<phonePort>3804</phonePort>
</capf>
</capfList>
<certHash></certHash>
<encrConfig>false</encrConfig>
</device>